Saturday, July 6, 2013

OPI Chic From Ears to Tail

For this manicure I used two shades from the Couture de Minnie Collection by OPI. The pink is Chic From Ears to Tail, and I used the glitter from Minnie Style for the accent line. I don't have many pinks in my collection, so to me Chic From Ears to Tail is unique. I want to love her, I really do. She has a lot of potential and could be great for nail art. But, sadly, she has a terrible formula. How does a polish manage to be thick and runny at the same time? I don't know, but she pulled it off spectacularly. I used three very even coats, and in some places it was still patchy. A good coat of Seche Vite top coat really helped to even things out, but I can still see some imperfections. What I do love about this polish is the color. I usually stay far, far away from Barbie-esque pinks, but this one is different somehow. It looks brighter in real life, but it isn't neon by any means. It has bluish/purple undertones which look great with my skin tone. My photographs don't quite capture the intensity and wash out the color a little bit. 

Outside in the shade. This is the most accurate depiction of the pink.

Full sun.


With flash. You can get a pretty good idea of the purple undertones in this picture.

Friday, June 21, 2013

Zucchini Bites with Hummus

Hello everyone! I have a simple and delicious recipe to share with you today. I am so excited to be a featured blogger on Fit Mom Diet. I post a monthly health eating recipe, and this is the most recent one. One of my favorite things about summertime is the abundance of fresh veggies. I can never get enough! The hummus is flavorful and full of protein, a perfect match for the roasted zucchini. 


Zucchini Bites with Hummus
Serves 4 as a side dish, 6 as an appetizer.
Ingredients:
  • 1 can garbanzo beans, drained with liquid reserved
  • 2 Tbsp tahini
  • 2 tsp salt (optional)
  • 1 lemon, zested and juiced
  • 2 cloves garlic, roughly chopped
  • 2 Tbsp olive oil
  • 4 zucchini
  • 2 Tbsp chopped flat leaf parsley
  • Salt and pepper (optional)
To make the hummus:
1. In a food processor combine the garbanzo beans, tahini, salt if you are using it, lemon juice, garlic, and 1 tbsp of the olive oil.
2. Process until smooth. If it’s too thick, you may need to add up to 4 tbsp of the reserved liquid from the beans.
To roast the zucchini:
1. Preheat oven to 400 degrees.
2. Slice zucchini on the diagonal, approximately 1/4 in thick.
3. Lightly coat zucchini slices with the remaining olive oil and season with salt (optional) and pepper.
4. Roast on a rimmed baking sheet for approximately 15-20min, or until tender. How long it takes will depend on how thick you slice the zucchini.
Combine:
1. Let zucchini cool to room temperature, top with a spoonful of hummus.
2. Sprinkle chopped parsley and lemon zest on top of the hummus.
3. Serve and enjoy!
This dish is good warm, but I believe the delicate lemon flavor is more pronounced when it’s served at room temperature. The hummus is even better if you make it a day ahead of time, but making before you serve it works well, too. If you anticipate having leftovers, I suggest storing the hummus and zucchini separate and combining just before you plan to serve it. I had extra hummus so I served it to my son with raw carrots and broccoli. He loved it!


Tuesday, June 11, 2013

OPI Minnie Style and Zoya Ali

I have been so busy lately and have missed posting on my blog. I have been trying to meet a friend for lunch for three or four weeks now, and have intended to call my sister in law for I don't know how long. Each time it seems like something else pops up! I guess that's what happens when you have a ten month old who just learned to walk and wants to climb on everything. Time. I just need more of it! 

Zoya Ali is a retina-searing pink neon, and Minnie Style is a glitter with matte white hexagons and fuchsia hexagons. The first time I used it I thought the glitter was a mix of pink and red but since then I've realized it only looked  different because of the lighting. Anyway, it goes with a lot of the polishes I own and I love the versatility. Ali never translates well in photographs, it's one of those colors you need to see in real life. I love how bright it is, but sometimes it's almost blinding. Adding the glitter toned it down a notch.


Shade


Sun

Flash

Thursday, June 6, 2013

Sally Hansen Fuzzy Coat

These just came out and I am so excited that I got my hands on them. I bought three, and I have two to show you today. A texture other than boring glitter? Yes, please!

First, the formula was good, maybe a little thicker than I'd like but nothing that a little thinner can't fix. Each polish has two different colored small bar glitters in a clear base. Maybe "glitter" isn't the best word to use, because they aren't shiny, but you get my drift :-) When you use multiple coats it looks like woven patches of yarn, or maybe shag carpeting. It appears very textured, but it is actually pretty smooth. One layer of topcoat completely covered any roughness. Fuzz-Sea was much easier to apply than Tweedy. I think next time I use Tweedy I'll have to add quite a bit of thinner.

This is Fuzz-Sea, it has aqua and pastel yellow in a clear base. I first wore it as an accent nail with OPI Jade is the New Black. I thought they were a perfect match. A few days later I chipped a nail and instead of fixing my mani I just added Fuzz-Sea to all my nails.
With flash.

This is in full sun.

The next one I used is called Tweedy, which is a simple black and white combination. One of my favorite looks is red, black, and white. I paired it with Innie Minnie Mighty Bow from the Couture de Minnie Collection. I loved this! I would have worn it longer, but sadly, it didn't stand up to a marathon dish washing session.

What do you think of these textured polishes?

Sunday, June 2, 2013

Nicole by OPI-Miss Independent

I just picked this up at Target, it was on sale for $4 and I can't pass up a deal like that! I don't usually like straight metallics but this one is slightly pink and I ended up really liking it. The formula was good, nice consistency and it didn't show brushstrokes as much as I thought it would. I used three coats here. In the shade it looks like smooth chrome, but it the sunlight you can see little tiny flecks of glitter and it sparkles like crazy. I think this color would be flattering on any skin tone.

Outside shade

Full sun

Shade


With flash

Tuesday, May 28, 2013

Pineapple Rum Cake


My best friend requested I make a cake that had pineapple and rum in it and this is what I came up with. It tastes better if you make it a day or two ahead of time. Don't worry about it drying out, it's nearly impossible with all the rum its soaked in!

Feel free to use less rum if you want, but we like our cakes full of booze over here!  

Pineapple Rum Cake

Preheat the oven to 325

For the pineapple layer:
2/3 C brown sugar
1/3 C water
5 Tbsp butter
1-20 oz. can of sliced pineapple in juice

Melt the first three ingredients together in a small saucepan on the stovetop. Simmer for about 6 minutes, or until it has thickened slightly. Pour into a greased 13x9 nonstick pan. Drain pineapple and reserve juice separately. Arrange pineapple slices over the brown sugar mixture. 

Now, prepare the batter:
1-box yellow cake mix
3 eggs, beaten
1 C buttermilk*
1/4 C water
1/4 C olive oil
1/4 C melted butter 
*if you don't have buttermilk use 1 C milk+1 Tbsp vinegar

Mix all ingredients until just combined. Pour batter over pineapples and bake for 35 min or until done. As soon as you take the cake out of the oven, invert it over a serving platter or large, rimmed cookie sheet. Let it sit a minute or two and slowly remove the cake pan. If any of the pineapple sticks, you can just place it back on the top of the cake and no one will know! 

Mix together and pour over warm cake:
4 Tbsp pineapple juice 
3/4 C dark rum (use the good stuff!) 

Serve with pineapple whipped cream:
1 pint heavy whipping cream
4 Tbsp pineapple juice 
2 Tbsp brown sugar 
1 tsp unflavored gelatin 

In a small microwave safe bowl sprinkle gelatin over 1 Tbsp of the pineapple juice. Start whipping the cream, sugar, and remaining juice. Melt gelatin mixture in the microwave for about 15 seconds. When the cream forms soft peaks, add liquid gelatin mixture and incorporate well. Serve over cake and enjoy! 


Thursday, May 23, 2013

OPI Pussy Galore

Pussy Galore. What can I say about you? You are pink....very pink. And full of sparkles. And I like you. 

This is the final Bond Girl I have to show you guys. I love this color, which is surprising. I'm not usually a fan of baby pink-way too girly for me! I think it's a combination of the texture and slight cool undertones that make this one wearable for me. It also has small dark pink glitter particles in the baby pink base. It adds some visual interest and I like that. Plus, I'm just waiting for someone to ask what I have on my nails so I can tell them the name!

The formula was similar to the other Bond Girls, perfect consistency and fast drying. No complaints there! I used two coats and that was good enough for full coverage. 

Inside, artificial light.

Outside shade.


Full sun. 

Wednesday, May 22, 2013

Chocolate Cake with Whipped Cream Frosting

I used to be the one who baked every single thing from scratch. Then I had kids, and well, I realized there is no shame in using a boxed mix every once in a while! Anything that saves time is worth a try. The key to making a boxed mix taste homemade is to add your own spin to it, don't follow the directions on the box.

I never use frosting in a can because I think it tastes horrible, it's always sickeningly sweet. I love homemade whipped cream, and it is easier to make than other frostings. I don't add much sugar and I think it complements the rich cake perfectly. You might like yours more sweet-you can always add a little more sugar! I also like to add gelatin to the whipped cream to stabilize it. It won't deflate into a watery mess and you can have a perfect cake for days, that is if you can keep from stuffing your face :-)


Here is my go to cake recipe:


Chocolate Cake with Whipped Cream Frosting 

One box of Betty Crocker chocolate fudge cake mix
3 eggs, beaten 
1 1/2 C water
1/3 C olive oil
2/3 C Greek yogurt
2 tsp vanilla  

Preheat oven to 325 if you are using a nonstick pan, or 350 if you are using a glass pan. 
Mix everything together until just combined. Bake in a greased 13x9 pan for 30-35 minutes. Check it early, you don't want it to dry out! 

While cake is cooling gather these ingredients for your whipped cream frosting:

2 tsp unflavored gelatin (just under one envelope)
2 Tbsp cold water
1 pint heavy whipping cream 
2-3 Tbsp sugar
2 tsp vanilla, or one vanilla bean, scraped 

Put the water in a small microwave safe dish and sprinkle gelatin over it. Let it sit until the gelatin has absorbed all the water. Microwave for 15-30 seconds-it will melt, but be careful you don't want it boiling over. Oops, I may have done just that! Whip cream in a stand mixer, just before soft peaks form add the sugar, vanilla, and liquid gelatin mixture. Whip little longer to insure the ingredients are well combined. 

Frost the cake once it's completely cool. Now you're ready to eat! You can make this ahead of time, the whipped cream keeps its texture for at least a few days. I don't know exactly how long it will keep...c'mon it's cake! In my house? Me *and* my husband? Two days, max.

Enjoy! 


Tuesday, May 21, 2013

OPI Couture de Minnie

I was going to post this yesterday, but I ended up taking E to the doctor and I ran out of time. Good news is he doesn't have a skin infection on his foot. He is just *really* allergic to insect/spider bites. What a relief! 

I have two polishes from the OPI Couture de Minnie Collection that will be released June. I lucked out because Ulta had them displayed early. Woohoo! I have always loved Minnie Mouse, so I think I'll have to buy the rest of the set. The bottle I'm holding is called Innie Minnie Mighty Bow. It's a beautiful blue toned red. It has a little bit of shimmer, but it's almost invisible unless you're in direct sun. I bought this one because I wanted something to go with the glitter, which is what my heart was really after! I think I only have two other reds, and they weren't exactly the right shade. I figured I might as well buy them together, they're part of a set so they'd complement each other, right? Well, it turns out that it looks even better than I imagined. IMMB has a perfect formula, it covered well with one coat, but I added a second just to make sure it looked its best in the photographs. It was really fast drying, too.

The glitter is called Minnie Style, and it's a mixture of matte white hexagons, and shiny pink and red hexagons. It was a little thick, but I added some Zoya thinner and it was fine after that. I dabbed the glitter on with the brush instead of brushing it on like I normally would. It distributed more evenly that way. I love the way these two polishes look together. Perfect!


Shade


Full sun.


Flash.

Thursday, May 16, 2013

OPI Glacier Bay Blues

Glacier Bay Blues is an old black label OPI from their Canadian Collection, Fall 2004. It is discontinued, so when I found it on Amazon I had to get it. I think I paid about ten bucks. Not bad! I am completely head over heels in love with this color. It is absolutely breath taking! I thought it was a teal/purple duochrome but once I put it on I realized it's more of a dark purple, green, royal blue multichrome. Love it! The photographs show the blue and green shades accurately but try as I might I cannot capture the beauty of the purple. You have to see it in person!

The only complaint I have with this polish is the formula. Saying it was a challenge to work with would be a huge understatement. Maybe I am just used to working with the newer Three Free polishes, I don't know. But this was a watery, cuticle-flooding disaster. And it was still patchy at three coats, so I had to add a fourth. Next time I wear it I'll probably layer two coats over black. Lastly, my fast dry topcoat, which works perfectly with EVERY OTHER polish I own didn't work well with GBB. It dented easily three hours after I put it on. 


Inside, filtered sunlight.


Outside, shade.


I love the way it looks in the bottle!


Outside, full sun. The purple you see in the bottle was the best representation I could get with my camera.

Inside.


This is a terrible, blurry, awful picture but I had to include it. It shows the green beautifully! Do I win an award for most awkward hand pose of all time? Arrrgggg The Claw!!!!

Monday, May 13, 2013

L'Oreal New Money

I hope all you moms out there had a wonderful Mother's Day! I enjoyed my weekend, and took some time off from my blog and work for Fit Mom Diet. The boys took me out to breakfast yesterday, cleaned the house, and let me relax. It was the best Mother's Day I've had yet. 

This is New Money by L'Oreal. I saw it at Target, and loved the color as soon as I laid eyes on it. It is a beautiful shade of chartreuse and I had to get it since its unique to my collection.  I was so impressed with the brush and the formula. It was a cinch to put on, the brush is thick, short, and rounded. I think it would be hard to mess up the application with such a perfect brush. The formula was the right consistency and covered well with two medium coats. It also dried lightening fast. I'll definitely have to buy more of their colors. The only downside I found was the size. The bottles are only a little over 11ml, and most of the other polishes I have are 15ml. It was cheaper, but I'd rather pay a few dollars more and get more polish! This color is so pretty, the pictures don't quite do it justice. 

Shade

Shade

Direct sun

With flash

Thursday, May 9, 2013

OPI Vesper

This is the third Bond Girls Liquid Sand I have to show you guys. It's a really interesting polish. It looks maroon in the bottle, purple at one coat, and almost black at two coats. It has tiny particles of black and white glitter. It isn't the same shiny glitter as Jinx or Solitaire, it looks more like actual pieces of sand. The texture is also grittier, which I don't mind at all. It was more difficult to work with than the other Liquid Sands. I found if I put it on too thick it was really patchy-purple with black globs. Not good! The second time I wore it (what you see here) I was meticulous with the application and it looked ten times better!

I'm positing from my phone so it's much easier to put all the pictures at the end. Love this one, it wears like a coat of cement, too!


Tuesday, May 7, 2013

FireStorm

I love this manicure! I started with a base coat of Zoya Heidi, over that I sponged Zoya Sharon, OPI A Roll in The Hague, and Essie Watermelon. I liked the gradient and I wore it for a day just like that. Then, not surprisingly, I got bored. I didn't want to run to Sally's to pick up some striping tape so I just cut thin strips of scotch tape instead. I taped off each nail and used one thick coat of Zoya Storm over the top. I like the way they came out- but they aren't perfect so don't look too closely! 

Before the Storm hits. See what I did there? ;-)


The lines kind of remind me of lasers. I like that it's a bit edgy.

You can see the small holographic particles better here. 

Shhh, don't tell anyone my edges aren't perfect!

Monday, May 6, 2013

Fever=No Sleep for Mama

I was going to post something this weekend but E has been sick. I don't think I've gotten more than three or four hours of sleep a night for...well, I'm so tired I can't even remember! I think it's been four nights of terrible sleep. He seems fine during the day, but the nights are rough. He falls asleep ok, but he is restless and cries a lot. I slept many hours in the recliner holding him. Now I think I'll have to make my first ever chiropractic appointment. Ouch.

Yesterday my husband made breakfast, and dinner! He also ran some errands for me, did five loads of laundry, cleaned the kitchen...I am one lucky lady! I haven't had a break in a long time, sometimes I think staying at home is harder than having a job in the outside world. Well, at least for me :-)

Hopefully tonight will be a better night. What do you moms out there do when your little ones are feverish? Any tips or tricks you swear by?

Here is a photo of a manicure I did weeks ago. I am glad I have some of these saved up! This is OPI Live and Let Die over Zoya Ali. I love the almost-black green and hot pink together. And, yes, even a post about a sick baby has to have nail polish included somehow!

Friday, May 3, 2013

OPI Solitaire

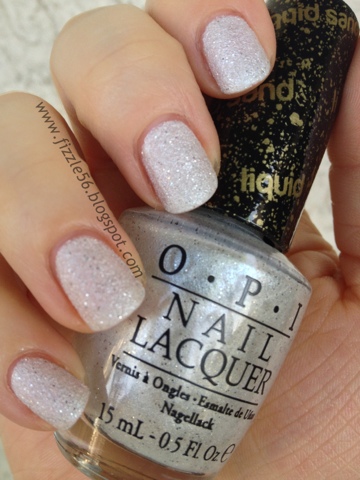
Solitaire and Jinx are my favorites from the Bond Girls Collection. I am not a huge fan of white but this has texture and sparkle, which I think keeps it from looking too harsh. Solitaire has little tiny bits of silver/black glitter in a silvery-white base. You look at it one way and it's obviously silver, but if you look again it looks black. Very cool! The glitter is sparse, which I think makes it looks even more interesting. The Liquid Sand texture fits perfectly here. It reminds me of snow, if you look closely you can see little tiny particles of glitter that look like ice crystals. 

I used three coats here, mainly because I'm a habitual three-coater. But I could have gotten by with two. The formula was great, it went on perfectly and it was easy to control the amount of polish coming off the brush. No cuticle flooding here-I didn't even have to do any clean up! Every time I look at this I love it more and more. I'll need to get another bottle because this is definitely back-up worthy. Love it!


Shade.


See the tiny bits of sparkle? Love it!


In full sun you can see the texture very well.


With flash.